Apache SpamAssassin is an open source Apache Project its user-friendly email utility which examines incoming mail for different spam characteristics, and the source was first made widely available back in April 2001 where it was imported into Sourceforge. Apache SpamAssassin uses various network tests and spam filtering to get an overall score in order to decide whether the mail should be considered as spam or not.
Why users cant see Apache SpamAssassin in their cPanel account
there are two things you have to check on WHM to verify that Apache SpamAssassin is enabled to the cPanel users:
- Login to your cPanel WHM control panel as root.
- Navigate to Home »Server Configuration »Tweak Settings
- Make sure that the setting Enable Apache SpamAssassin™ spam filter is set to On “This should be default value”
- Click Save button.
Other cause is that may be its not enabled on Feature Manager for the packages, to do so :
- Login to your cPanel WHM control panel as root.
- Navigate to Home »Packages »Feature Manager »Feature Lists.
- Under Manage feature list choose the packages that not displaying Apache SpamAssassin “example,Default”. And click Edit button.
- From the list make sure that Apache SpamAssassin™ option is checked , you repeat the steps for each packages you want.
- Click Save button.
After you make sure that you check both Features List and Enable Apache SpamAssassin in Tweak Settings , your cPanel account should be able to see the SpamAssassin icon on Email section from cPanel home dashboard.
How to configure SpamAssassin in cPanel
- Login to your cPanel control panel.
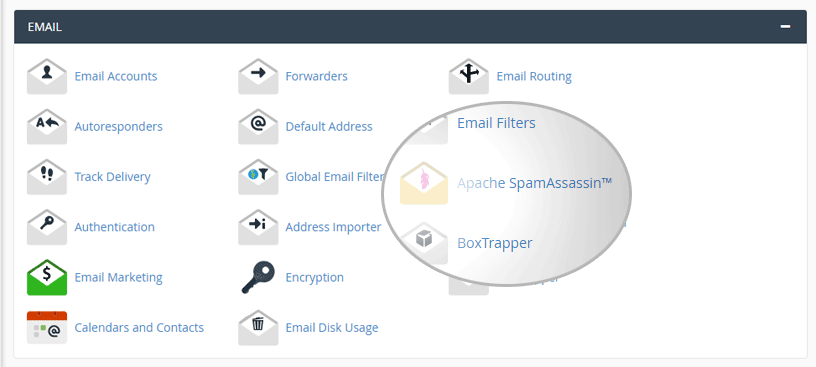
- From Email Section on Home dashboard cPanel click Apache SpamAssassin icon.
- From Apache SpamAssassin™ page click Enable Apache SpamAssassin™ button. and you will get confirmation Apache SpamAssassin™ is now enabled message
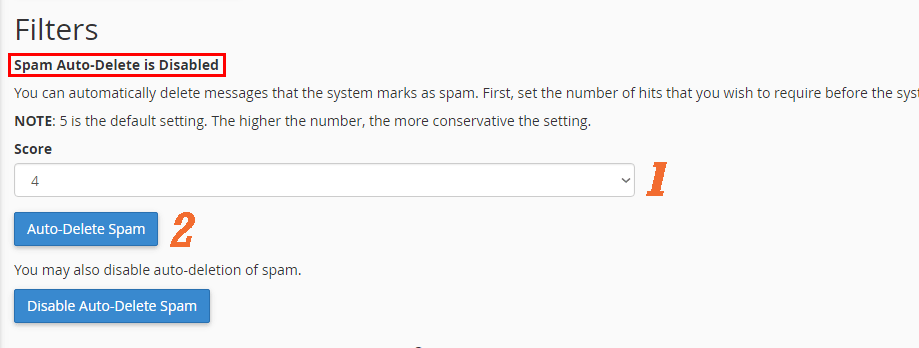
- Now you can configure the Filter from the same Page :Setting Spam Auto-Delete option help you to automatically removes the emails which meet or exceed the spam score set. In order to set it,You can set the required score in a drop-down menu (from 1 to 10). The higher the number, the more conservative the setting. To enable the filter, simply click on Auto-Delete Spam button. To disable the filter, click on Disable Auto-Delete Spam button.
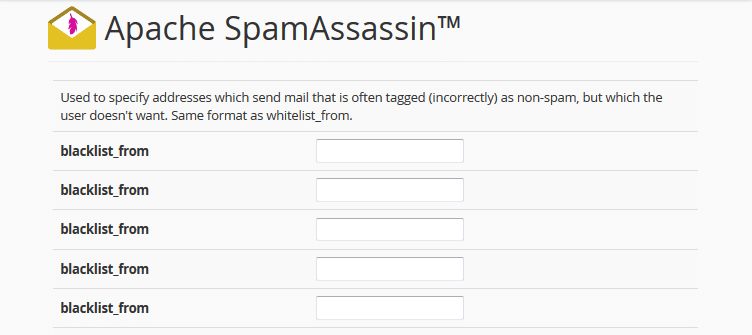
- Apache SpamAssassin Configuration:
- To add sender to Apache SpamAssassin Blacklist : you can fill the list of blacklist_from
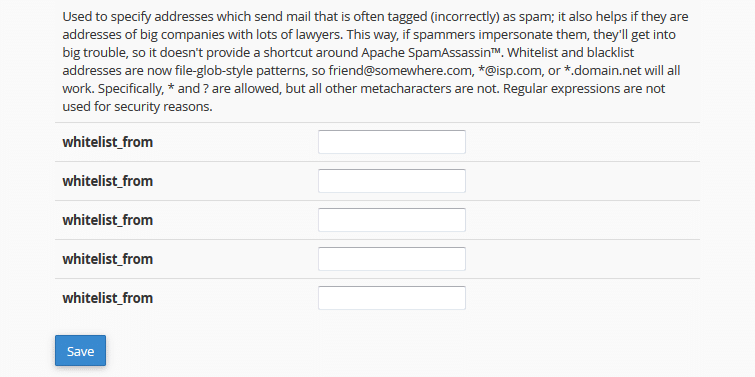
- If SpamAssassin often blocks certain email senders and marks its mails as spam (incorrectly), it is possible to add the sender to whitelist in whitelist_from.
Blacklist
Whitelist
Both whitelist and blacklist addresses accept file-glob-style patterns, so user@example.com, *@example.com or *.example.com will all work. Specifically * and ? are allowed, but all other metacharacters are not. Regular expressions are not used for security reasons.


